Page Contents
Setting Up Custom Headers
In some circumstance, a user may need to set up a custom header, such as a Cache-Control header or an Expire header.
In this guide, we will set up custom headers over a JavaScript and CSS file, as an example.
Step 1
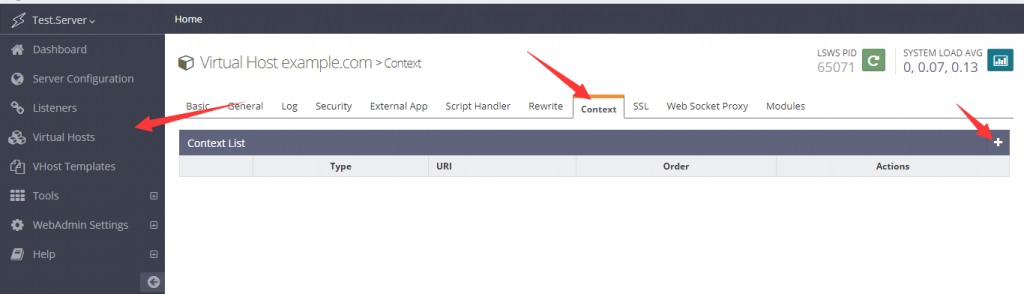
Log in to the WebAdmin Console via https://IP:7080, go to Virtual Hosts > Context, and create a new context.
Step 2
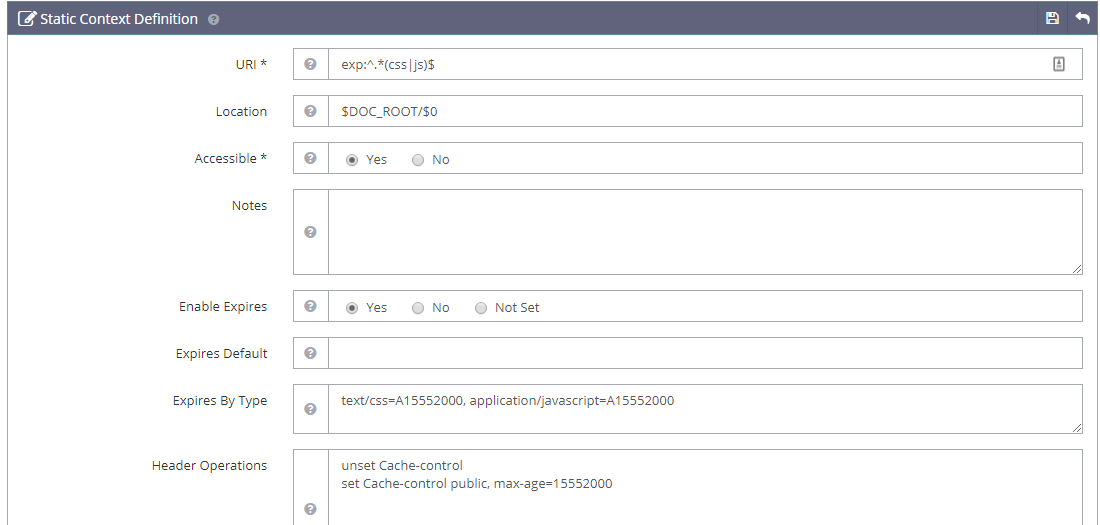
In the newly created context, set Type to Static.

Since the targeted files are JS and CSS, use regex to match all files of those types for URI, like so:
exp:^.*(css|js)$You can add more static file extensions, if you like, for example:
exp:^.*(woff|woff2|jpg|jpeg|png|css|js)$Set Location to $DOC_ROOT/$0. We need the $0 because URI uses regex.
Set Accessible to Yes.
Set Enable Expire to Yes.
Set Expires by Type to the following (15552000 seconds equals 180 days):
application/javascript=A15552000, text/css=A15552000Set Header Operations to the following:
unset Cache-control
set Cache-control public, max-age=15552000
The unset cache-control line removes the previous cache control header, before the new one is set in the next line.
Save and restart.
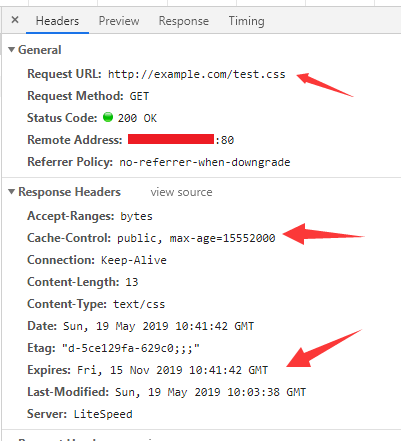
Verification
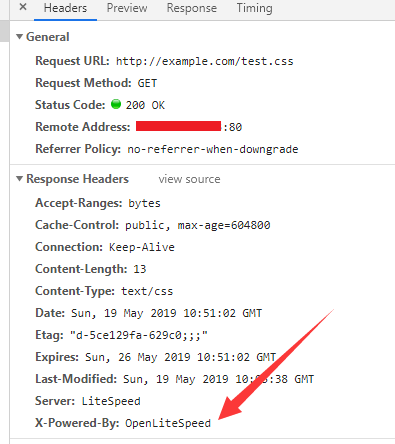
You can look for the new response header from the browser’s development tool.
Adding Custom Headers
If more headers need to be added, the syntax and usage are similar to that of Apache’s mod_headers directives for supported operations.
Here’s an example that adds an X-Powered-By header:
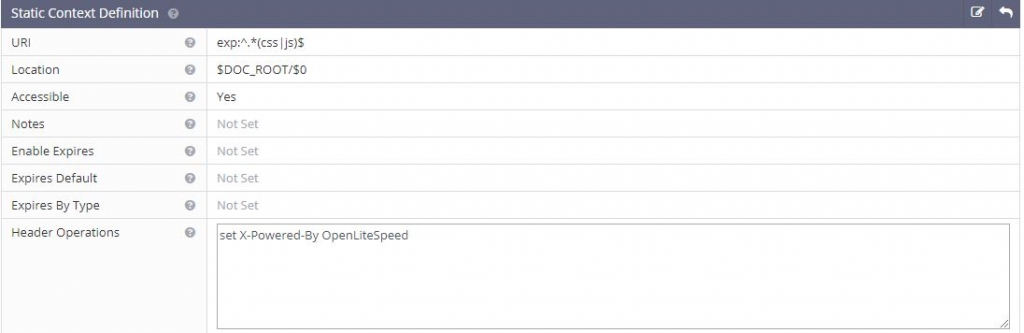
The verified result:
Useful Headers for WordPress Sites
This is an example context for a typical WordPress site. Add Expire, Cache-Control and CORS headers for static resources.
exp:^.*(css|gif|ico|jpeg|jpg|js|png|webp|woff|woff2|fon|fot|ttf)$Set Location to $DOC_ROOT/$0. We need the $0 because URI uses regex.
Set Accessible to Yes.
Set Enable Expire to Yes.
Set Expires by Type to the following (15552000 seconds equals 180 days):
text/css=A15552000, image/gif=A15552000, image/x-icon=A15552000, image/jpeg=A15552000, application/x-javascript=A15552000, text/javascript=A15552000, application/javascript=A15552000, image/png=A15552000, image/webp=A15552000, font/ttf=A15552000, font/woff=A15552000, font/woff2=A15552000, application/x-font-ttf=A15552000, application/x-font-woff=A15552000, application/font-woff=A15552000, application/font-woff2=A15552000Set Header Operations to the following:
unset Cache-control
set Cache-control public, max-age=15552000
set Access-Control-Allow-Origin: *
The result:
[root@test ~]# curl -I -XGET https://example.com/wp-includes/css/dist/block-library/theme.min.css?ver=5.2.4
HTTP/1.1 200 OK
Expires: Fri, 01 May 2020 21:18:01 GMT
Etag: "5d7-5dbf3aff-181c04;;;"
Last-Modified: Sun, 03 Nov 2019 20:39:27 GMT
Content-Type: text/css
Content-Length: 1495
Accept-Ranges: bytes
Date: Sun, 03 Nov 2019 21:18:01 GMT
Server: LiteSpeed
Cache-Control: public, max-age=15552000
Access-Control-Allow-Origin: *
Connection: Keep-Alive
You will see that both Cache-Control and Expire have been set to 6 months , and also the Access-Control-Allow-Origin: * header is present for CDN service.
Please be aware that you may have to flush your CDN cache and configure your CDN service to respect or pass through origin header in order to make the CORS header work.
WordPress with LiteSpeed Cache Plugin
If you have the LiteSpeed Cache plugin for WordPress, and are getting a 404 error because of combined/minifed JS/CSS files, please do the following:
Remove js| and css| from the exp: string above.
Now create two new contexts: one for CSS and one for JS.
The CSS context should have following settings:
Set URI to /wp-content/cache/css/
Set Location to $DOC_ROOT/wp-content/cache/css/.
Set Accessible to Yes.
Set Enable Expire to Yes.
Set Expires by Type to the following (15552000 seconds equals 180 days):
text/css=A15552000Set Header Operations to the following:
unset Cache-control
set Cache-control public, max-age=15552000
set Access-Control-Allow-Origin: *
The JS context should have the following settings:
Set URI to /wp-content/cache/js/
Set Location to $DOC_ROOT/wp-content/cache/js/.
Set Accessible to Yes.
Set Enable Expire to Yes.
Set Expires by Type to the following (15552000 seconds equals 180 days):
application/x-javascript=A15552000, text/javascript=A15552000, application/javascript=A15552000
Set Header Operations to the following:
unset Cache-control
set Cache-control public, max-age=15552000
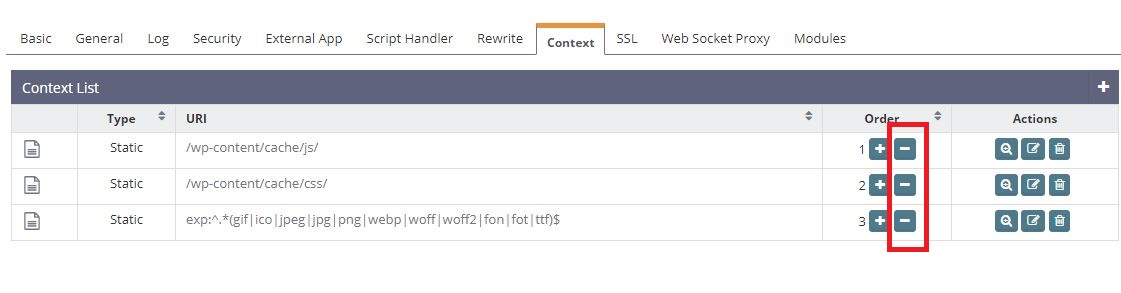
set Access-Control-Allow-Origin: *In the Order tab, click the - symbol to reorder the contexts so that JS and CSS are above the regex URI context, as shown in the screenshot:
Save and restart.
Setting Custom Headers in DirectAdmin
While logged into DirectAdmin as admin, navigate to Custom HTTPD Configurations > your domain openlitespeed.conf > Customize. Then add the following code to CUSTOM 7:
context exp:^.*(css|gif|ico|jpeg|jpg|js|png|webp|woff|woff2|fon|fot|ttf)$ {
  location                $DOC_ROOT/$0
  allowBrowse             1
  enableExpires           1
  expiresByType           text/css=A15552000, image/gif=A15552000, image/x-icon=A15552000, image/jpeg=A15552000, application/x-javascript=A15552000, text/javascript=A15552000, application/javascript=A15552000, image/png=A15552000, image/webp=A15552000, font/ttf=A15552000, font/woff=A15552000, font/woff2=A15552000, application/x-font-ttf=A15552000, application/x-font-woff=A15552000, application/font-woff=A15552000, application/font-woff2=A15552000
  extraHeaders            <<<END_extraHeaders
unset Cache-control
set Cache-control public, max-age=15552000
set Access-Control-Allow-Origin: *
  END_extraHeaders


  rewrite  {

  }
  addDefaultCharset       off

  phpIniOverride  {

  }
}
Save and restart OpenLiteSpeed.
Security Headers
Security headers are HTTP response headers that a web server sends to a client (typically a web browser) to provide an additional layer of security for a website or application.
They help protect against various types of attacks and vulnerabilities, such as cross-site scripting (XSS), clickjacking, code injection, and others.
To learn more about the types of security headers and how to add them to your OpenLiteSpeed configuration, please see Setting Up Security Headers on OpenLiteSpeed.