Page Contents
Setting up Redmine on OpenLiteSpeed
- Setting up Redmine
Requirements
This guide assumes that you already have the following set up prior to running these instructions
- OpenLiteSpeed 1.4.41+
- MariaDB ( or another SQL server )
For more specific requirements for Redmine please check here.
Installing Ruby & Dependencies
The commands in this section should be run via an elevated command prompt. If not elevated, be sure to use a sudo user and add the term sudo before the commands.
Dependencies
Ubuntu 18.04
apt-get install build-essential zlib1g-dev libmagickwand-dev imagemagick libmysqlclient-devRuby
Ubuntu 18.04
apt-get install ruby ruby-devRuby Gems
gem install bundler ruby-lsapiConfiguring OpenLiteSpeed
This section requires you to be able to access the WebAdmin Console. It can usually be accessed by visiting https://<DOMAIN.TLD/IP>:7080.
Creating a Virtual Host
Navigate over to the Virtual Host tab and hit the Add button. On this page you will want to adjust the following settings:
Virtual Host Name:       Redmine
Virtual Host Root:       /usr/local/lsws/vhosts/redmine
Config File:             $SERVER_ROOT/conf/vhosts/$VH_NAME/vhconf.conf
Follow Symbolic Link:    Yes
Enable Scripts/ExtApps:  Yes
Restrained:              Yes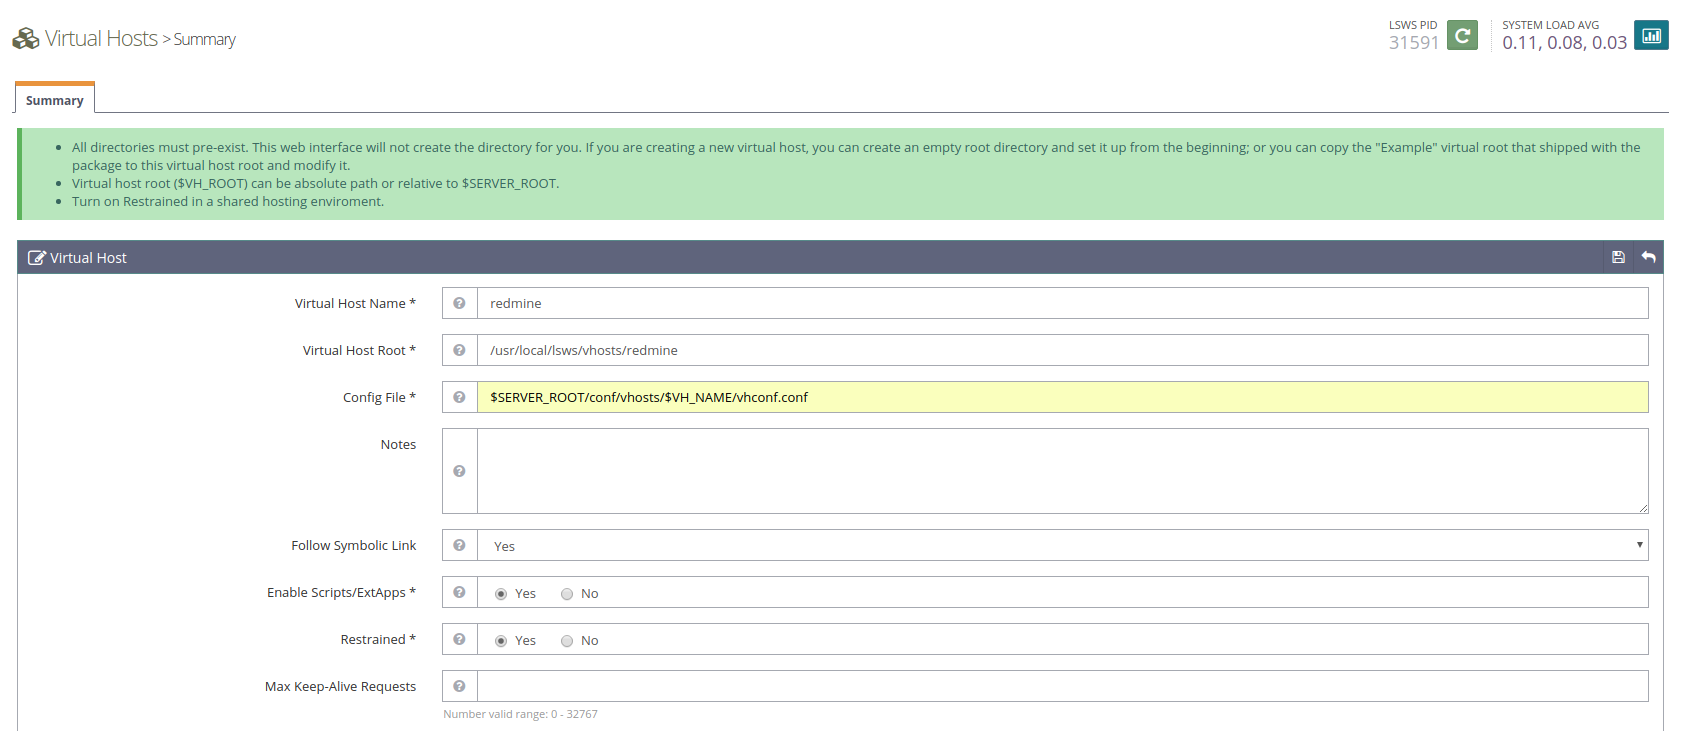
Once that is filled out, hit save. If the Config File does not already exist the program will prompt you to create it. Just click CLICK TO CREATE, then hit save again.

Set the Document Root
Navigate to the newly created Virtual Host and go to the General tab and click Edit. On this page you will want to modify the following setting:
Document Root: /usr/local/lsws/vhosts/redmine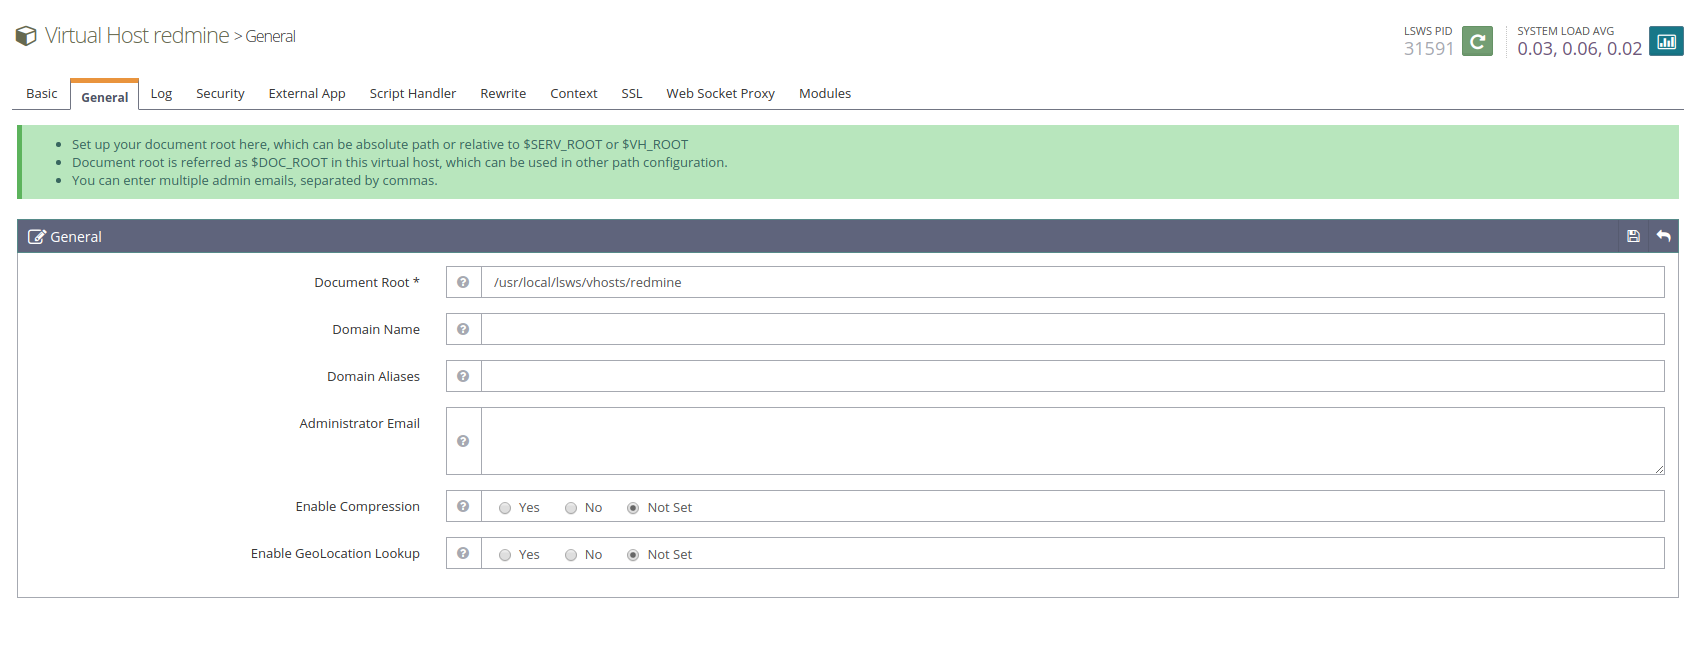
Once the Document Root setting is set, be sure to hit the Save button.
Setup the App Server
Navigate over to the Virtual Host and go to the Context tab and click the Add button. On this page you will select which type of context to create.
Type: App Server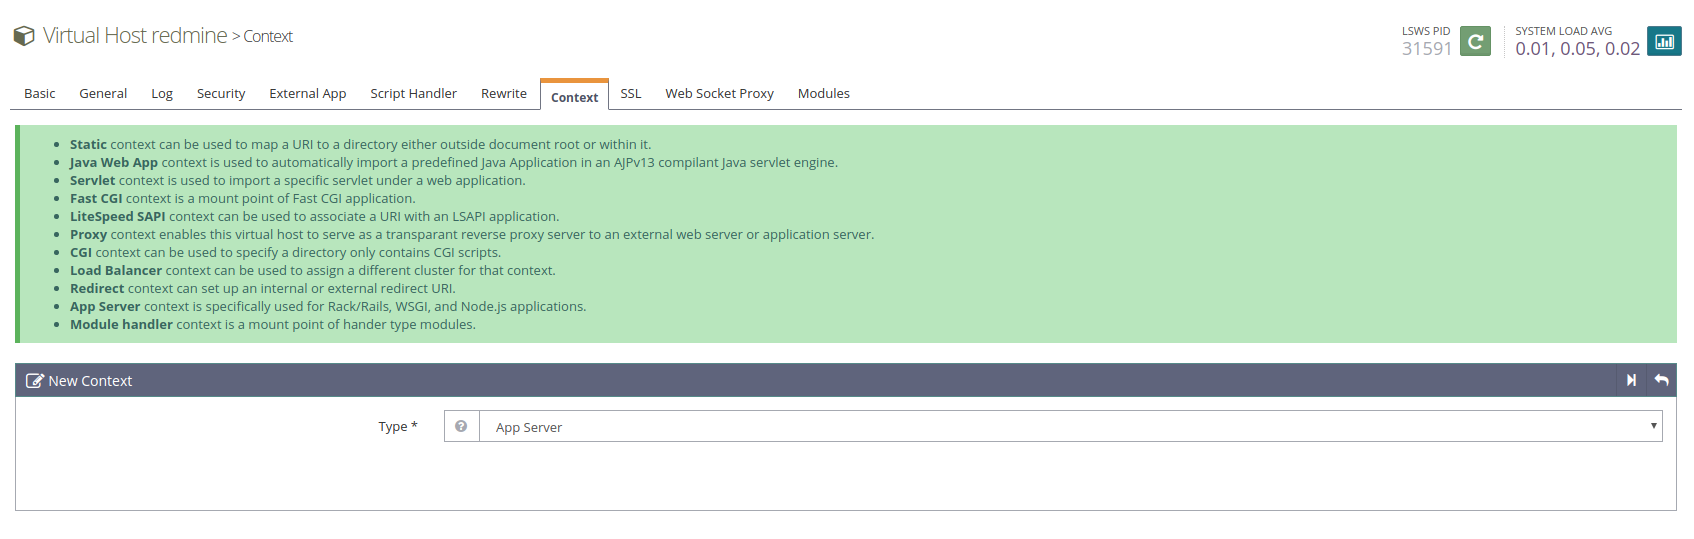
Click the next button. Once you are on the next page, fill in the following settings:
URI:                /
Location:           /usr/local/lsws/vhosts/redmine
Binary Path:        /usr/bin/ruby
Application Type:   Rails
Run-time Mode:      Production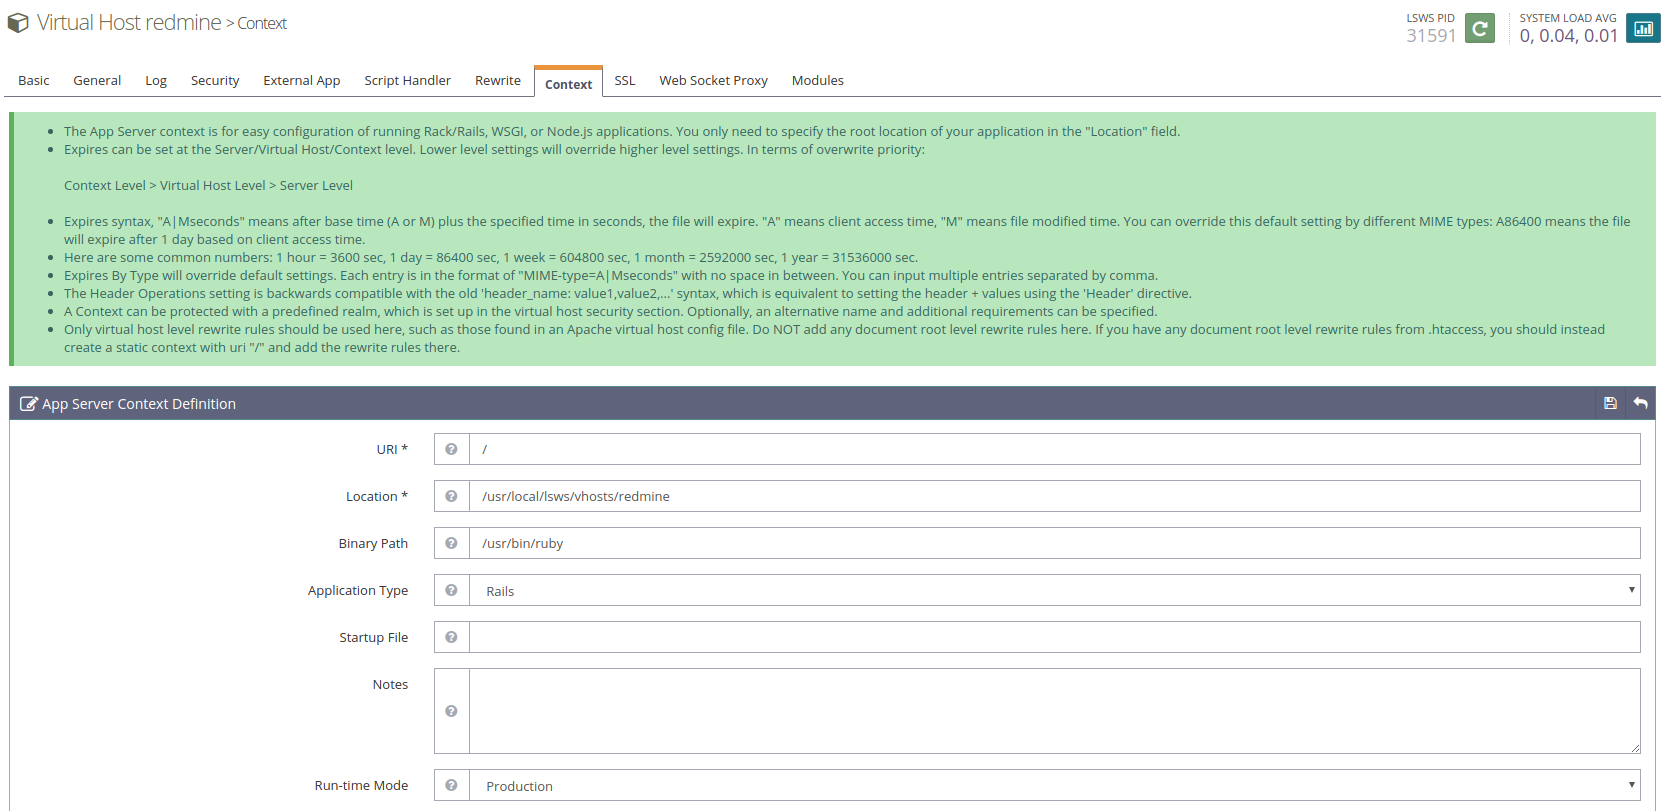
If you are using something other than the default Ruby path be sure to change it to the path of Ruby that you want to use. Also, if you are going to run this in a mode other than Production be sure to change that as well. Once everything is set be sure to hit save.
Setup the Listener
Navigate to the Listener tab and add the following Virtual Host Mappings for each listener you want Redmine to listen on.
Virtual Host:   redmine
Domains:        redmine-ols.local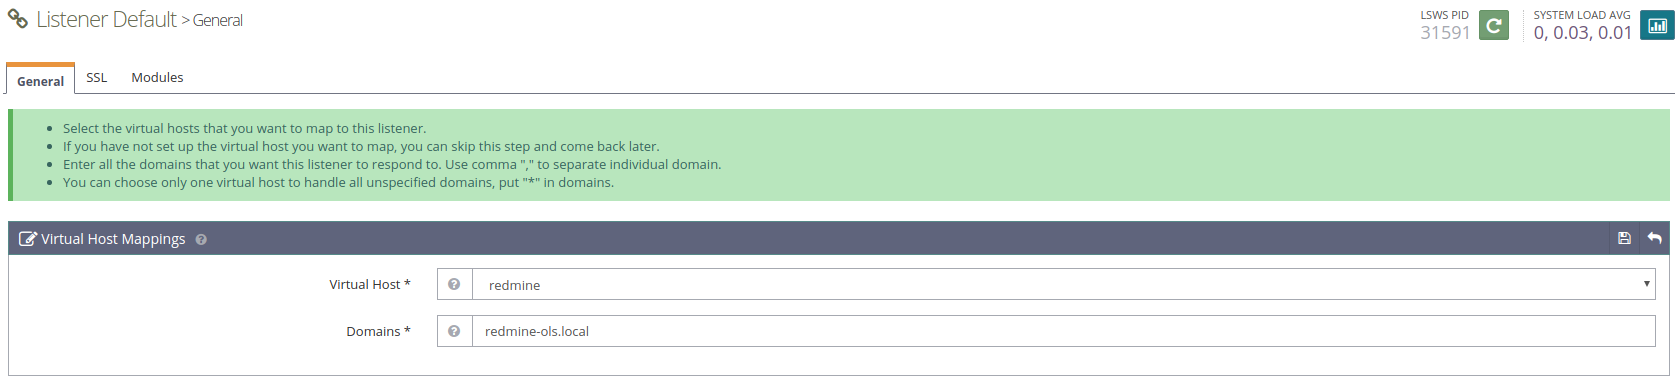
Be sure to replace redmine-ols.local with the domain you plan on using for Redmine.
Create the Virtual Host Directory
Inside of a command prompt or an FTP client, create the following directory: /usr/local/lsws/vhosts/redmine
Command Line Example
sudo mkdir -p /usr/local/lsws/vhosts/redmineInstalling Redmine
This section assumes that you are in an elevated command prompt. If you are not in an elevated command prompt you may need to run sudo before the commands listed. For downloading and extracting, it is possible to use an FTP or sFTP client, though this guide will only focus on how to do it via the command line.
Download, Extract, and Move
Download the latest version from here. At the time of writing this, the latest version is 4.0.1. Once it is downloaded extract the files and move them to the Virtual Host directory we just created and set up with OpenLiteSpeed.
wget http://www.redmine.org/releases/redmine-4.0.1.tar.gz
tar -xzf redmine-4.0.1.tar.gz
cp -pr redmine-4.0.1/* /usr/local/lsws/vhosts/redmine/
Change Directories
Change the current working directory to the Virtual Host directory to continue configuring and setting up Redmine.
cd /usr/local/lsws/vhosts/redmineSetup SQL
Log into MariaDB with mysql -p and run the following to create the database and user that Redmine will use:
CREATE DATABASE redmine CHARACTER SET utf8mb4;
CREATE USER 'redmine'@'localhost' IDENTIFIED BY 'my_password';
GRANT ALL PRIVILEGES ON redmine.* TO 'redmine'@'localhost';
Be sure to change the names of the database and user. Change the password as well if you want to enhance security by not using default values.
Configure SQL
First we will need to move the example database config to a file without .example.
mv config/database.yml.example config/database.ymlNext, open up config/database.yml with your favorite text editor and edit/add the following:
production:
  adapter: mysql2
  database: redmine
  host: localhost
  port: 3306
  username: redmine
  password: "my_password"
Be sure to switch the values if you did not use the default ones from the Setup SQL section.
Gems
Install the specific Gems Redmine needs to function.
bundle install --without development testIt is possible to add onto the --without part for un-needed Gems like rmagik, postgres, etc. but please consult the Redmine documentation before doing so.
Session Store Secret Generation
Create a secret token for sessions using bundle.
bundle exec rake generate_secret_tokenDatabase
Migrate and load the default database information for the production environment.
RAILS_ENV=production bundle exec rake db:migrate
RAILS_ENV=production bundle exec rake redmine:load_default_data
Files
Create needed folders and set the correct permissions for Redmine to fully work.
mkdir -p tmp tmp/pdf public/plugin_assets
chmod -R 755 files log tmp public/plugin_assets
chown -R nobody:nogroup *
Restart
Now that Redmine is set up and configured, we need to restart OpenLiteSpeed so it can run the Ruby application. This can be done by running the following command:
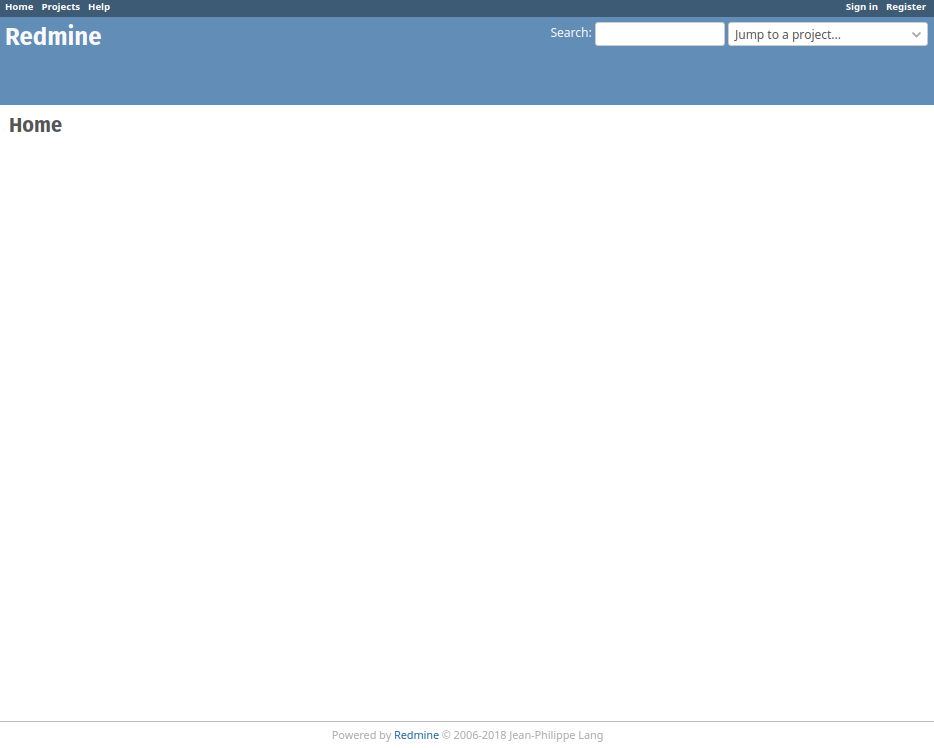
/usr/local/lsws/bin/lswsctrl restartFinished!
That’s it! Navigate over to your browser and visit your site. You should see the following:
Further Configuration of Redmine
For further configuration of Redmine please check out Redmine’s documentation here.